
Basic Medical Procedure and First Aid

General Medicine (HA) – Second Year
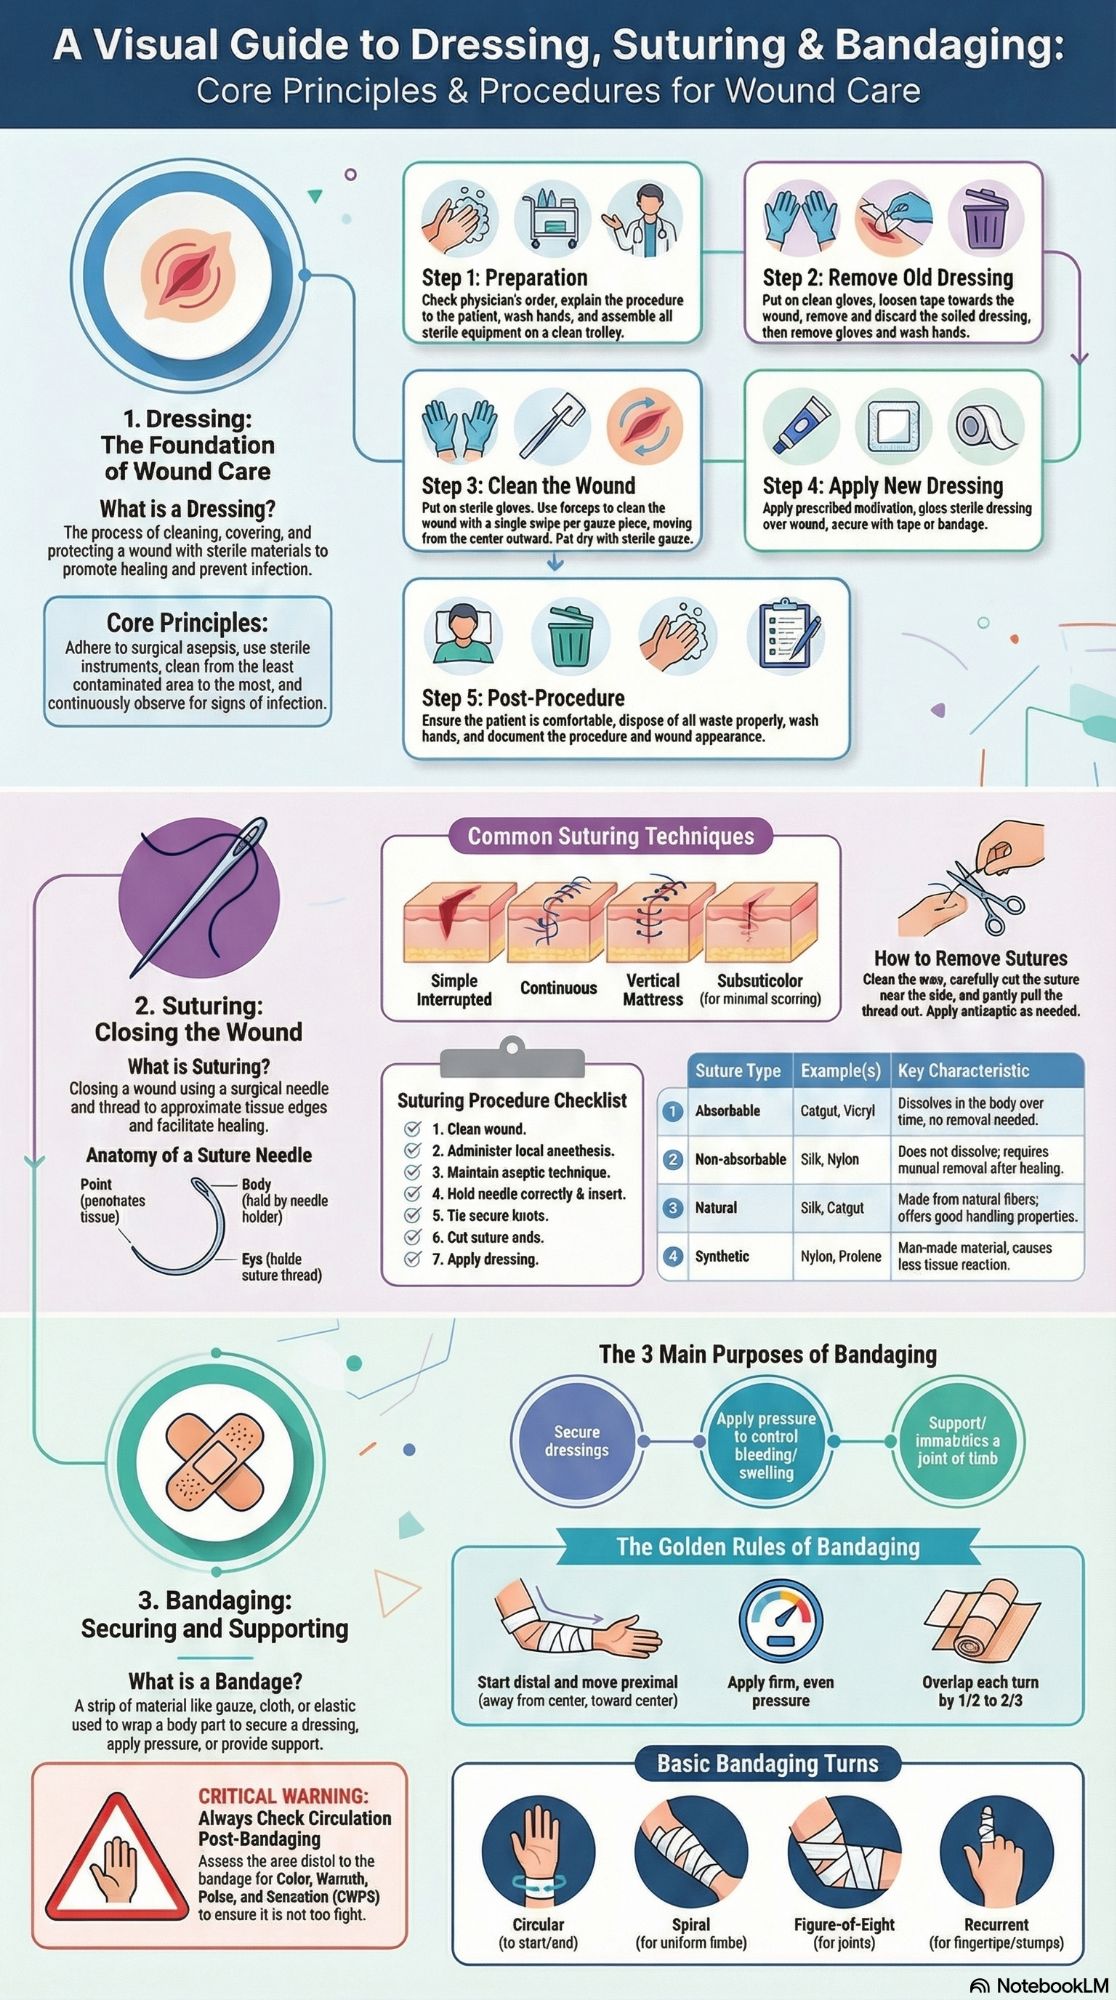
Unit 6: Wound Care
Importance of Proper Wound Care
Effective wound care is essential for preventing infections, promoting healing, minimizing scarring, and ensuring optimal functional recovery. This unit covers three fundamental components: dressing changes using surgical asepsis, suturing techniques for wound closure, and proper bandaging methods for support and protection. Mastering these skills is crucial for managing acute injuries, surgical wounds, and chronic ulcerations.
Follow the Basic Medical Procedures and First Aid Page for more resources and clinical demonstrations.
1. Dressing
Definition & Principles
Definition: The process of cleaning, covering, and protecting a wound using sterile materials to promote healing and prevent infection.
Principles of Dressing
- Maintain surgical asepsis throughout
- Use sterile instruments and materials
- Clean wound from clean to dirty area
- Do not touch sterile items with bare hands
- Observe wound for signs of infection
- Ensure patient comfort and privacy
- Document wound appearance and care
Procedure for Dressing with Surgical Asepsis
Check order, explain, wash hands, assemble equipment
Comfortable position, expose wound, maintain privacy
Gloves on, loosen tape toward wound, discard soiled dressing
Open sterile pack, pour antiseptic without contamination
Sterile gloves, single swipe per gauze, clean to dirty
Topical medication if ordered, sterile gauze, secure
Patient comfort, waste disposal, hand hygiene, document
⚠️ Critical Points
- Always clean from center outward (wound to surrounding skin)
- Use single swipe per gauze to avoid recontamination
- Check for signs of infection: redness, swelling, pus, odor
- Document wound characteristics: size, depth, exudate, granulation
2. Suturing
Definition & Basics
Definition: The process of closing a wound using surgical thread and needle to promote healing.
Parts of a Needle
- Point: Penetrates tissue
- Body: Held by needle holder
- Eye: Holds suture thread
Suture Sets Include
- Needle holder
- Tissue forceps
- Scissors
- Suture material
- Sterile drapes
Types of Sutures & Characteristics
| Type | Example | Characteristics |
|---|---|---|
| Absorbable | Catgut, Vicryl | Dissolves naturally, no removal needed |
| Non-absorbable | Silk, Nylon, Prolene | Needs removal, stronger long-term |
| Natural | Silk, Catgut | Good handling, more tissue reaction |
| Synthetic | Nylon, Vicryl, PDS | Less tissue reaction, predictable absorption |
Suturing Techniques
Most common, independent stitches
Everts edges, for deep/fragile skin
Fast, even tension distribution
Provides hemostasis along line
Minimal scar, within dermal layer

Suturing Procedure
- Clean wound area thoroughly with antiseptic
- Administer local anesthesia as needed
- Maintain strict aseptic technique
- Hold needle correctly with needle holder
- Insert needle at 90° angle to skin surface
- Pass through both wound edges equally
- Tie knot securely but not too tight
- Cut suture ends 2-3mm from knot
- Apply sterile dressing
- Document procedure and provide aftercare instructions
Suture Removal
General Timeline
- Face: 3-5 days
- Scalp: 7-10 days
- Arms/Legs: 7-14 days
- Joints: 10-14 days
- Torso: 10-14 days
Removal Procedure
- Clean wound with antiseptic
- Lift suture knot with forceps
- Cut suture near skin surface
- Pull gently toward wound side
- Apply antiseptic ointment
- Cover with sterile dressing if needed
- Document removal and wound status
Surgical Sets for Dressing and Suturing
Dressing Set Includes
Suturing Set Includes
3. Bandaging
A. Bandage Types
Long strip rolled up (gauze, crepe, elastic)
Right-angled triangle for slings, head injuries
Shaped like “T” for perineal dressings
Split tails for jaw/chin (Barton bandage)
Elastic, for support and compression
Self-adherent, sticks to itself
B. Purpose & Principles
Purpose of Bandaging
- Secure dressings in place
- Apply pressure to control bleeding
- Reduce edema and swelling
- Provide support and immobilize joints
- Prevent or reduce deformity
- Protect wound from contamination
Principles (Rules of Bandaging)
- Face Patient: Stand in front of the part
- Support Limb: Hold in functional position
- Distal → Proximal: Start from farthest point
- Even Pressure: Firm, consistent, not too tight
- Overlap Turns: 1/2 to 2/3 width overlap
- Check Circulation: Monitor CWPS after
C. Bandaging Techniques & Removal
Applying Different Types of Bandages
For cylindrical parts, start/finish bandage
For limbs of uniform thickness
For cone-shaped limbs (forearm/leg)
For joints (ankle, elbow, knee)
For finger/stump tips
For hip, shoulder, thumb
Bandage Removal
- Remove gently to avoid skin damage
- Use bandage scissors if needed
- Observe wound and skin condition
- Check circulation (CWPS)
- Change if wet, dirty, or too tight
- Dispose of soiled bandages safely
- Document findings
CWPS Check
Color • Warmth • Pulse • Sensation
Monitor before, during, and after bandaging
📚 Memory Aids & Key Points
Dressing Principles
Aseptic Technique: “Clean to Dirty”
Wound Cleaning: “Center Outward”
Gauze Use: “One Swipe Per Piece”
Documentation: “RED: Redness, Exudate, Depth”
Suture Selection
Face: Fine non-absorbable (6-0)
Abdomen: Absorbable for fascia
Skin: Non-absorbable or staples
Mucosa: Fast-absorbing gut
Bandaging Rules
D to P: Distal to Proximal
Overlap: 1/2 to 2/3 width
Check: CWPS every 4 hours
Signs of Tightness: Pain, Numbness, Pallor
🩺 Clinical Tips & Best Practices
Infection Prevention
- Hand hygiene before and after
- Use appropriate antiseptics
- Change dressings when soiled
- Monitor for early signs of infection
- Follow wound care protocols
Patient Education
- Teach signs of infection
- Instruct on dressing changes
- Explain suture/bandage care
- Discuss activity restrictions
- Provide written instructions
Special Considerations
- Diabetic wounds: Extra vigilance
- Pressure ulcers: Offloading crucial
- Burns: Moist wound healing
- Pediatrics: Age-appropriate explanations
- Elderly: Fragile skin care
Topic Tags
Wound Dressing
Suturing
Suture Techniques
Bandaging
Bandage Types
Surgical Asepsis
Wound Healing
Infection Control
Dressing Procedure
Suture Removal
Triangular Bandage
Figure-Eight Bandage
Wound Assessment
Sterile Technique
Clinical Skills
First Aid Procedures
Healthcare Techniques
Medical Procedures
Patient Care
📋 Summary & Key Points
- Dressing: Maintain surgical asepsis, clean from center outward, use single swipe per gauze
- Suturing: Choose appropriate suture material and technique based on wound location and depth
- Suture Removal: Follow anatomical timeline, cut near skin, pull toward wound side
- Bandaging: Apply from distal to proximal, check CWPS regularly, use appropriate technique
- Infection Signs: Redness, swelling, warmth, pain, purulent discharge
- Documentation: Record wound characteristics, procedures performed, patient response
- Patient Education: Teach wound care, signs of complications, follow-up requirements
For more resources, contact via WhatsApp: 9816819593 or visit CTEVT Nepal